はじめに

NativeScript で アプリ内のファイル、フォトライブラリの 画像/動画、カメラで撮影した画像/動画 をアップロード(multipart/form-data)する方法。

TL;DR

  • axios + form-data でのアップロードは不可
    • ファイルアップロード無しの単純な API Request なら axios でも可能
  • nativescript-background-http でアップロード
  • iOS で フォトライブラリやカメラを使う場合、一度アプリ内にファイルを保存する必要がある
この記事が参考になった方
ここここからチャージや購入してくれると嬉しいです(ブログ主へのプレゼントではなく、ご自身へのチャージ)
欲しいもの / Wish list

目次

  1. はじめに
  2. TL;DR
  3. 環境・条件
  4. 詳細
    1. axios + FormData 使用不可
    2. 解決方法: background-http を使う
      1. セットアップ
      2. Step1: アプリ内のファイルを選択
      3. Step2: ImagePicker を利用
      4. Step3: カメラを利用
    3. 補足: ファイルアップロードがなければ axios 自体は利用可能
  5. まとめ
  6. その他・メモ
  7. 参考文献

環境・条件

1
2
3
4
5
6
7
8
9
10
11
12
13
14
15
16
17
18
19
20
21
22
23
24
25
26
27
28
29
30
31
32
33
34
35
36
37
38
39
40
41
42
43
44
45
46
47
48
49
50
51
52
53
54
55
$ sw_vers
ProductName: Mac OS X
ProductVersion: 10.15.3
BuildVersion: 19D76

$ node -v
v12.7.0

$ npm -v
6.10.3

$ tns --version
6.4.0

$ grep -C1 version package.json
"tns-ios": {
"version": "6.4.1"
},
"tns-android": {
"version": "6.4.1"
}

$ tns plugin
Dependencies:
┌───────────────────────────────┬─────────┐
│ Plugin │ Version │
│ @nativescript/theme │ ^2.2.1 │
│ @vue/devtools │ ^5.0.6 │
│ axios │ ^0.19.2 │
│ nativescript-background-http │ ^4.2.1 │
│ nativescript-barcodescanner │ ^3.4.1 │
│ nativescript-camera │ ^4.5.0 │
│ nativescript-fingerprint-auth │ ^7.0.2 │
│ nativescript-imagepicker │ ^7.1.0 │
│ nativescript-permissions │ ^1.3.8 │
│ nativescript-plugin-firebase │ ^10.4.0 │
│ nativescript-socketio │ ^3.2.1 │
│ nativescript-toasty │ ^1.3.0 │
│ nativescript-vue │ ^2.4.0 │
│ nativescript-vue-devtools │ ^1.2.0 │
│ tns-core-modules │ ^6.0.0 │
│ vuex │ ^3.1.1 │
└───────────────────────────────┴─────────┘
Dev Dependencies:
┌────────────────────────────────────┬─────────┐
│ Plugin │ Version │
│ @babel/core │ ^7.0.0 │
│ @babel/preset-env │ ^7.0.0 │
│ babel-loader │ ^8.0.2 │
│ nativescript-dev-webpack │ ^1.0.0 │
│ nativescript-vue-template-compiler │ ^2.0.0 │
│ nativescript-worker-loader │ ~0.9.0 │
│ node-sass │ ^4.9.2 │
│ vue-loader │ ^15.4.0 │
└────────────────────────────────────┴─────────┘
  • iPhone 11 Pro: iOS 13.3
  • Android HUAWEI nova lite 2: Android 9 (ビルド 9.1.0.160)

詳細

axios + FormData 使用不可

NativeScript で axios + form-data でファイルアップロード含む API リクエストを試そうとしたところ、アプリが起動しない状態となった。

参考: axios で添付ファイルありのリクエスト(multipart/form-data の POST)

試したのは下記パッケージ。

form-data - npm
formdata-node - npm

1
2
3
// どちらを使ってもダメ
const FormData = require('form-data');
import FormData from "formdata-node"

Fatal JavaScript exception - application has been terminated., JS ERROR TypeError: undefined is not an object (evaluating 'global.process.version.slice') のエラーでアプリが起動しない。

エラー詳細は下記。

1
2
3
4
5
6
7
8
9
10
11
12
13
14
15
16
17
18
19
20
21
22
23
24
25
26
27
28
29
30
31
32
33
34
35
36
37
38
39
40
41
42
43
44
45
46
47
48
49
50
51
52
53
54
55
56
57
58
59
60
61
62
***** Fatal JavaScript exception - application has been terminated. *****
Native stack trace:
1 0x100df980e NativeScript::reportFatalErrorBeforeShutdown(JSC::ExecState*, JSC::Exception*, bool)
2 0x100e4b784 -[TNSRuntime executeModule:referredBy:]
3 0x1003cb123 main
4 0x7fff5227ec25 start
JavaScript stack trace:
file:///node_modules/readable-stream/lib/_stream_writable.js:57:80
at ../node_modules/readable-stream/lib/_stream_writable.js(file:///app/vendor.js:123288:34)
at __webpack_require__(file:///app/webpack/bootstrap:750:0)
at fn(file:///app/webpack/bootstrap:120:0)
at ../node_modules/readable-stream/readable.js(file:///node_modules/readable-stream/readable.js:15:29)
at __webpack_require__(file:///app/webpack/bootstrap:750:0)
at fn(file:///app/webpack/bootstrap:120:0)
at ../node_modules/stream-browserify/index.js(file:///node_modules/stream-browserify/index.js:28:26)
at __webpack_require__(file:///app/webpack/bootstrap:750:0)
at fn(file:///app/webpack/bootstrap:120:0)
at file:///node_modules/formdata-node/lib/FormData.js:18:22
at ../node_modules/formdata-node/lib/FormData.js(file:///app/vendor.js:83566:34)
at __webpack_require__(file:///app/webpack/bootstrap:750:0)
at fn(file:///app/webpack/bootstrap:120:0)
at ../node_modules/babel-loader/lib/index.js!../node_modules/vue-loader/lib/index.js?!./pages/PostData.vue?vue&type=script&lang=js&(file:///app/bundle.js:215:90)
at __webpack_require__(file:///app/webpack/bootstrap:750:0)
at fn(file:///app/webpack/bootstrap:120:0)
<…>
JavaScript error:
file:///node_modules/readable-stream/lib/_stream_writable.js:57:80: JS ERROR TypeError: undefined is not an object (evaluating 'global.process.version.slice')
(CoreFoundation) *** Terminating app due to uncaught exception 'NativeScript encountered a fatal error: TypeError: undefined is not an object (evaluating 'global.process.version.slice')
at
file:///node_modules/readable-stream/lib/_stream_writable.js:57:80
at ../node_modules/readable-stream/lib/_stream_writable.js(file:///app/vendor.js:123288:34)
at __webpack_require__(file:///app/webpack/bootstrap:750:0)
at fn(file:///app/webpack/bootstrap:120:0)
at ../node_modules/readable-stream/readable.js(file:///node_modules/readable-stream/readable.js:15:29)
at __webpack_require__(file:///app/webpack/bootstrap:750:0)
at fn(file:///app/webpack/bootstrap:120:0)
at ../node_modules/stream-browserify/index.js(file:///node_modules/stream-browserify/index.js:28:26)
at __webpack_require__(file:///app/webpack/bootstrap:750:0)
at fn(file:///app/webpack/bootstrap:120:0)
at file:///node_modules/formdata-node/lib/FormData.js:18:22
at ../node_modules/formdata-node/lib/FormData.js(file:///app/vendor.js:83566:34)
at __webpack_require__(file:///app/webpack/bootstrap:750:0)
at fn(file:///app/webpack/bootstrap:120:0)
at ../node_modules/babel-loader/lib/index.js!../node_modules/vue-loader/lib/ind<…>
NativeScript caught signal 6.
Native Stack:
1 0x100e4a3e1 sig_handler(int)
2 0x7fff5245b42d _sigtramp
3 0x1
4 0x7fff5234ba5c abort
5 0x7fff502497f8 __cxa_bad_cast
6 0x7fff502499c7 demangling_unexpected_handler()
7 0x7fff513fbd7c _objc_terminate()
8 0x7fff50256e97 std::__terminate(void (*)())
9 0x7fff502568fe __cxa_get_exception_ptr
10 0x7fff502568c5 __cxxabiv1::exception_cleanup_func(_Unwind_Reason_Code, _Unwind_Exception*)
11 0x7fff513fbc44 _objc_exception_destructor(void*)
12 0x100df9d4f NativeScript::reportFatalErrorBeforeShutdown(JSC::ExecState*, JSC::Exception*, bool)
13 0x100e4b784 -[TNSRuntime executeModule:referredBy:]
14 0x1003cb123 main
15 0x7fff5227ec25 start
JS Stack:

解決方法: background-http を使う

参考にしたページ

セットアップ

1
$ tns plugin add nativescript-background-http

Step1: アプリ内のファイルを選択

実装サンプル

まずはサンプルコード

1
2
3
4
5
6
7
8
9
10
11
12
13
14
15
16
17
18
19
20
21
22
23
24
25
26
27
28
29
30
31
32
33
34
35
36
37
38
39
40
41
42
43
44
45
46
47
48
49
50
51
52
53
54
55
56
57
58
59
60
61
62
63
64
65
66
67
68
69
70
71
72
73
74
75
76
77
78
79
80
81
82
83
84
85
86
87
88
89
90
91
92
93
94
95
96
97
98
<template>
<Page>
<ActionBar title="Post data"/>
<StackLayout>
<Label class="label" text="Name"/>
<TextField class="input" hint="name" :text="name" v-model="name" />
<Button text="Post" @tap="postData" />
</StackLayout>
</Page>
</template>

<script >
import * as fs from 'tns-core-modules/file-system';
import * as bgHttp from 'nativescript-background-http';

export default {
name: 'PostData',
data() {
return {
name: '',
logoDir: 'assets/images',
logoFileName: 'NativeScript-Vue.png',
apiBase: 'https://jsonplaceholder.typicode.com/posts', // https://jsonplaceholder.typicode.com/guide.html
}
},
computed: {
logoFile: function () {
return fs.path.normalize(
`${fs.knownFolders.currentApp().path}/${this.logoDir}/${this.logoFileName}`
);
},
},
methods: {
postData() {
if (this.hasInputData()) {
this.postDataMultiPart();
} else {
this.postDataImageOnly();
}
},
// 画像単体のみを送信する場合
postDataImageOnly() {
const url = `${this.apiBase}`;
// 引数('image-upload' の部分) は Session ID として利用される
// (※複数セッションを同時に使わない限りは気にしなくて良さそう)
const session = bgHttp.session(`image-upload`);
const request = {
url,
method: 'POST',
headers: {
'Content-Type': 'application/octet-stream',
'File-Name': this.logoFileName,
},
description: `uploading ${this.logoFileName}`,
};
const task = session.uploadFile(this.logoFile, request); // ファイル単体の場合は uploadFile を使う

// アップロードセッションのイベントハンドラ
task.on('progress', e => console.log({ on: 'progress', e }));
task.on('error', e => console.log({ on: 'error', e }));
task.on('responded', e => console.log({ on: 'responded', e }));
task.on('complete', e => console.log({ on: 'complete', e }));
task.on('cancelled', e => console.log({ on: 'cancelled', e }));
},
// 画像以外に他データも含む場合
postDataMultiPart() {
const url = `${this.apiBase}`;
const session = bgHttp.session(`image-upload`);
const request = {
url,
method: 'POST',
headers: {
'Content-Type': 'application/octet-stream',
},
description: `multipart/form-data`,
};
const params = [
{ name: 'name', value: this.name, },
{ name: 'image', filename: this.logoFile, mimeType: 'image/png', },
];
const task = session.multipartUpload(params, request); // 他データも含む場合は multipartUpload を使う

// アップロードセッションのイベントハンドラ
task.on('progress', e => console.log({ on: 'progress(multipart)', e }));
task.on('error', e => console.log({ on: 'error(multipart)', e }));
task.on('responded', e => console.log({ on: 'responded(multipart)', e }));
task.on('complete', e => console.log({ on: 'complete(multipart)', e }));
task.on('cancelled', e => console.log({ on: 'cancelled(multipart)', e }));
},
hasInputData() {
return this.name;
},
hasImage() {
return this.logoFile;
},
},
}
</script>

ざっくり解説。

ファイルパスが必要なので tns-core-modules/file-system を利用。fs.path.normalizefs.knownFolders.currentApp().path を組み合わせて画像ファイルへのパスを取得。

1
2
3
4
5
6
import * as fs from 'tns-core-modules/file-system';
fs.path.normalize(
`${fs.knownFolders.currentApp().path}/assets/images/NativeScript-Vue.png`
);
// => '/Users/xxxx/Library/Developer/CoreSimulator/Devices/1234...CDEF/data/Containers/Bundle/Application/ABCD...6789/YourApp.app/app/assets/images/NativeScript-Vue.png',
// ※シミュレータ実行時

bgHttp.session('key') でセッションを初期化、同時並行で複数セッションを扱うような場合は 'key' 部分を重複しないものにする。

第2引数(request)に URL などの情報を設定。利用可能なパラメータは Upload request and task API を参照、Android only なパラメータが結構ある。

他入力値がなければ(ファイル単体のアップロードならば) uploadFile、そうでなければ multipartUpload を使う。

multipartUpload を使う場合は、POST パラメータはオブジェクトの配列で設定する。

uploadFile, multipartUpload の戻り値(task)に対して、イベントハンドラが設定可能。進行状況、完了、キャンセルなどのイベントをハンドリングできる。詳しくは Handling upload events を参照。

1
2
3
4
5
6
7
8
9
10
11
12
13
14
15
16
17
18
19
20
21
22
23
24
25
26
27
28
29
30
31
32
33
34
35
{ on: 'progress',
e:
{ eventName: 'progress',
object: { _observers: [Object], _task: [Object], _session: {} },
currentBytes: 8414,
totalBytes: 8414
}
}

{ on: 'responded',
e:
{ eventName: 'responded',
object: { _observers: [Object], _task: [Object], _session: {} },
data: '{"id": 101}',
responseCode: -1
}
}

{ on: 'progress',
e:
{ eventName: 'progress',
object: { _observers: [Object], _task: [Object], _session: {} },
currentBytes: undefined,
totalBytes: undefined
}
}

{ on: 'complete',
e:
{ eventName: 'complete',
object: { _observers: [Object], _task: [Object], _session: {} },
responseCode: 201,
response: {}
}
}

Step2: ImagePicker を利用

nativescript-imagepicker を使って、フォトライブラリの画像を選択してアップロード。

参考:

app/App_Resources/iOS/Info.plist を編集

1
2
3
4
5
6
7
8
9
10
11
 ...
<plist version="1.0">
<dict>
...
+ <key>NSAppTransportSecurity</key>
+ <dict>
+ <key>NSAllowsArbitraryLoads</key>
+ <true/>
+ </dict>
</dict>
</plist>

nativescript-permissions を追加。Android で外部ストレージ(SDカード など)の参照権限要求に利用する。
nativescript-imagepicker をインストールすると追加されているはず。

1
$ tns plugin add nativescript-permissions
実装サンプル

サンプルコード

1
2
3
4
5
6
7
8
9
10
11
12
13
14
15
16
17
18
19
20
21
22
23
24
25
26
27
28
29
30
31
32
33
34
35
36
37
38
39
40
41
42
43
44
45
46
47
48
49
50
51
52
53
54
55
56
57
58
59
60
61
62
63
64
65
66
67
68
69
70
71
72
73
74
75
76
77
78
79
80
81
82
83
84
85
86
87
88
89
90
91
92
93
94
95
96
97
98
99
100
101
102
103
104
105
106
107
108
109
110
111
112
113
114
115
116
117
118
119
120
121
122
123
124
125
126
127
128
129
130
131
132
133
134
135
136
137
138
<template>
<Page>
<ActionBar title="Post data"/>
<ScrollView>
<StackLayout>
<Label class="label" text="Name"/>
<TextField class="input" hint="name" :text="name" v-model="name" />
<Button text="Select a photo" @tap="selectPhoto" />
<Image :src="image" stretch="fill" />
<Button text="Post" @tap="postData" />
</StackLayout>
</ScrollView>
</Page>
</template>

<script >
import { isIOS, isAndroid } from "tns-core-modules/platform";
import { ImageSource } from 'tns-core-modules/image-source/image-source';
import * as fs from 'tns-core-modules/file-system';
import * as imagepicker from 'nativescript-imagepicker';
import * as bgHttp from 'nativescript-background-http';
import * as permissions from 'nativescript-permissions';

export default {
name: 'PostData',
data() {
return {
name: '',
image: null,
imagePath: null,
apiBase: 'https://jsonplaceholder.typicode.com/posts', // https://jsonplaceholder.typicode.com/guide.html
}
},
methods: {
selectPhoto() {
const context = imagepicker.create({ mode: 'single', mediaType: 'Image' });
// 権限の要求
context.authorize({})
.then(() => context.present()) // 選択画面の表示
.then(selection => this.setImage(selection[0])) // 選択画像の処理
.catch(err => {
console.error({err});
this.image = null;
});
},
setImage(imageAsset) {
this.image = imageAsset;
if (isAndroid) {
// Android は imageAsset.android にファイルパスが入っている
this.imagePath = imageAsset.android;
} else {
// iOS はファイルパスが取得できないため、アプリ内にファイルを一時保存する必要がある
const folder = fs.knownFolders.documents(); // ユーザーからは見えないディレクトリ
this.imagePath = fs.path.join(folder.path, 'temp.png');
// png として保存
ImageSource.fromAsset(imageAsset).then(imageSource => {
imageSource.saveToFile(this.imagePath, 'png');
});
}
},
postData() {
if (!this.hasInputData() && !this.hasImage()) {
return;
}

// 画像ファイルが設定されている場合
if (this.hasImage()) {
// 他データもある場合場合
if (this.hasInputData()) {
this.postDataMultiPart();
} else {
this.postDataImageOnly();
}
} else {
// 画像なし
const data = {
name: this.name,
email: this.email,
password: this.password,
introduction: this.introduction,
};
this.axiosPost(data);
}
},
// 画像単体のみを送信する場合
postDataImageOnly() {
const url = `${this.apiBase}`;
// 引数('image-upload' の部分) は Session ID として利用される
// (※複数セッションを同時に使わない限りは気にしなくて良さそう)
const session = bgHttp.session(`image-upload`);
const request = {
url,
method: 'POST',
headers: {
'Content-Type': 'application/octet-stream',
'File-Name': 'temp.png',
},
description: `uploading temp.png`,
};
const task = session.uploadFile(this.imagePath, request); // ファイル単体の場合は uploadFile を使う
task.on('progress', e => console.log({ on: 'progress', e }));
task.on('error', e => console.log({ on: 'error', e }));
task.on('responded', e => console.log({ on: 'responded', e }));
task.on('complete', e => console.log({ on: 'complete', e }));
task.on('cancelled', e => console.log({ on: 'cancelled', e }));
},
// 画像以外に他データも含む場合
postDataMultiPart() {
const url = `${this.apiBase}`;
const session = bgHttp.session(`image-upload`);
const request = {
url,
method: 'POST',
headers: {
'Content-Type': 'application/octet-stream',
},
description: `multipart/form-data`,
};
const params = [
{ name: 'name', value: this.name, },
{ name: 'image', filename: this.imagePath, mimeType: 'image/png', },
];
const task = session.multipartUpload(params, request); // 他データも含む場合は multipartUpload を使う
task.on('progress', e => console.log({ on: 'progress(multipart)', e }));
task.on('error', e => console.log({ on: 'error(multipart)', e }));
task.on('responded', e => console.log({ on: 'responded(multipart)', e }));
task.on('complete', e => console.log({ on: 'complete(multipart)', e }));
task.on('cancelled', e => console.log({ on: 'cancelled(multipart)', e }));
},
hasInputData() {
return this.name;
},
hasImage() {
return this.image !== null;
},
},
}
</script>

ざっくり解説。

ImagePicker 自体の使い方は NativeScript で フォトライブラリの 画像や動画 を参照 を参照。

画像選択後の処理を setImage で実施している。

1
2
3
4
5
6
7
8
9
10
11
12
13
14
15
setImage(imageAsset) {
this.image = imageAsset;
if (isAndroid) {
// Android は imageAsset.android にファイルパスが入っている
this.imagePath = imageAsset.android;
} else {
// iOS はファイルパスが取得できないため、アプリ内にファイルを一時保存する必要がある
const folder = fs.knownFolders.documents(); // ユーザーからは見えないディレクトリ
this.imagePath = fs.path.join(folder.path, 'temp.png');
// png として保存
ImageSource.fromAsset(imageAsset).then(imageSource => {
imageSource.saveToFile(this.imagePath, 'png');
});
}
},

コメントで書いている通り、Android は imageAsset.android に画像ファイルのパスが設定されているのでそれを利用すれば良いが、iOS の場合はファイルパスが無いのでいったん保存する必要がある。
参考: comment-400560349 - IOS : Selected image is empty · Issue #197 · NativeScript/nativescript-imagepicker

保存先は fs.knownFolders.documents() で取得、アプリ内のユーザーからは見えない場所に保存する。ImageSource.fromAsset で読み込んで、saveToFile で拡張子を png にして保存している。

あとは Step1 と同じ流れでリクエストすればよい。

参考: Base64 でアップロード

試してはないが Base64 でのアップロードも可能なようで、その場合はファイルを保存する必要はない。

参考: comment-439544426 - IOS : Selected image is empty · Issue #197 · NativeScript/nativescript-imagepicker

Step3: カメラを利用

NativeScript/nativescript-camera を使って、撮影した画像をアップロード。

参考: NativeScript でカメラの利用(写真の撮影)

サンプルコード
1
2
3
4
5
6
7
8
9
10
11
12
13
14
15
16
17
18
19
20
21
22
23
24
25
26
27
28
29
30
31
32
33
34
35
36
37
38
39
40
41
42
43
44
45
46
47
48
49
50
51
52
53
54
55
56
57
58
59
60
61
62
63
64
65
66
67
68
69
70
71
72
73
74
75
76
77
78
79
80
81
82
83
84
85
86
87
88
89
90
91
92
93
94
95
96
97
98
99
100
101
102
103
104
105
106
107
108
109
110
111
112
113
114
115
116
117
118
119
120
121
122
123
124
125
126
127
128
129
130
131
132
133
134
135
136
137
138
139
140
141
142
143
144
145
146
147
148
149
150
151
152
153
154
155
156
157
158
159
160
161
162
163
164
165
166
167
168
169
170
171
172
173
174
175
176
177
178
179
180
181
182
183
184
185
186
187
188
189
190
191
192
193
<template>
<Page>
<ActionBar title="Post data"/>
<ScrollView>
<StackLayout>
<Label class="label" text="Name"/>
<TextField class="input" hint="name" :text="name" v-model="name" />
<Button text="Take/Select a photo" @tap="takeOrSelectPhoto" />
<Image :src="image" stretch="fill" />
<Button text="Post" @tap="postData" />
</StackLayout>
</ScrollView>
</Page>
</template>

<script >
import { isIOS, isAndroid } from "tns-core-modules/platform";
import { ImageSource } from 'tns-core-modules/image-source/image-source';
import * as fs from 'tns-core-modules/file-system';
import * as camera from 'nativescript-camera';
import * as imagepicker from 'nativescript-imagepicker';
import * as bgHttp from 'nativescript-background-http';
import * as permissions from 'nativescript-permissions';

export default {
name: 'PostData',
data() {
return {
name: '',
image: null,
imagePath: null,
apiBase: 'https://jsonplaceholder.typicode.com/posts', // https://jsonplaceholder.typicode.com/guide.html
}
},
methods: {
takeOrSelectPhoto() {
action(
'Take or Select a photo',
'Cancel',
['Take a photo', 'Select a photo']
).then(result => {
switch (result) {
case 'Take a photo':
this.takePhoto();
break;

case 'Select a photo':
this.selectPhoto();
break;

case 'Cancel':
default:
console.log('Canceled');
break;
}
});
},
takePhoto() {
console.log('Take a photo');
// 権限の要求
camera.requestPermissions()
.then(
// 許可
() => {
console.log('Permitted');
camera.takePicture({
keepAspectRatio: true,
saveToGallery: false,
allowsEditing: true,
cameraFacing: 'rear',
}).then(imageAsset => {
this.setImage(imageAsset);
})
.catch(err => {
console.error({err});
this.image = null;
});
},
// 拒否
() => {
console.log('Denied to use camera/photo library');
alert({
title: 'カメラ利用',
message: 'カメラを利用するには「設定」→「プライバシー」から「写真」と「カメラ」の利用を許可してください',
okButtonText: 'OK',
});
}
).catch(err => console.error({err}));
},
selectPhoto() {
const context = imagepicker.create({ mode: 'single', mediaType: 'Image' });
// 権限の要求
context.authorize({})
.then(() => context.present()) // 選択画面の表示
.then(selection => this.setImage(selection[0])) // 選択画像の処理
.catch(err => {
console.error({err});
this.image = null;
});
},
setImage(imageAsset) {
this.image = imageAsset;
if (isAndroid) {
// Android は imageAsset.android にファイルパスが入っている
this.imagePath = imageAsset.android;
} else {
// iOS はファイルパスが取得できないため、アプリ内にファイルを一時保存する必要がある
const folder = fs.knownFolders.documents(); // ユーザーからは見えないディレクトリ
this.imagePath = fs.path.join(folder.path, 'temp.png');
// png として保存
ImageSource.fromAsset(imageAsset).then(imageSource => {
imageSource.saveToFile(this.imagePath, 'png');
});
}
},
postData() {
if (!this.hasInputData() && !this.hasImage()) {
return;
}

// 画像ファイルが設定されている場合
if (this.hasImage()) {
// 他データもある場合場合
if (this.hasInputData()) {
this.postDataMultiPart();
} else {
this.postDataImageOnly();
}
} else {
// 画像なし
const data = {
name: this.name,
email: this.email,
password: this.password,
introduction: this.introduction,
};
this.axiosPost(data);
}
},
// 画像単体のみを送信する場合
postDataImageOnly() {
const url = `${this.apiBase}`;
// 引数('image-upload' の部分) は Session ID として利用される
// (※複数セッションを同時に使わない限りは気にしなくて良さそう)
const session = bgHttp.session(`image-upload`);
const request = {
url,
method: 'POST',
headers: {
'Content-Type': 'application/octet-stream',
'File-Name': 'temp.png',
},
description: `uploading temp.png`,
};
const task = session.uploadFile(this.imagePath, request); // ファイル単体の場合は uploadFile を使う
task.on('progress', e => console.log({ on: 'progress', e }));
task.on('error', e => console.log({ on: 'error', e }));
task.on('responded', e => console.log({ on: 'responded', e }));
task.on('complete', e => console.log({ on: 'complete', e }));
task.on('cancelled', e => console.log({ on: 'cancelled', e }));
},
// 画像以外に他データも含む場合
postDataMultiPart() {
const url = `${this.apiBase}`;
const session = bgHttp.session(`image-upload`);
const request = {
url,
method: 'POST',
headers: {
'Content-Type': 'application/octet-stream',
},
description: `multipart/form-data`,
};
const params = [
{ name: 'name', value: this.name, },
{ name: 'image', filename: this.imagePath, mimeType: 'image/png', },
];
const task = session.multipartUpload(params, request); // 他データも含む場合は multipartUpload を使う
task.on('progress', e => console.log({ on: 'progress(multipart)', e }));
task.on('error', e => console.log({ on: 'error(multipart)', e }));
task.on('responded', e => console.log({ on: 'responded(multipart)', e }));
task.on('complete', e => console.log({ on: 'complete(multipart)', e }));
task.on('cancelled', e => console.log({ on: 'cancelled(multipart)', e }));
},
hasInputData() {
return this.name;
},
hasImage() {
return this.image !== null;
},
},
}
</script>

ざっくり解説。

camera 自体の使い方は NativeScript でカメラの利用(写真の撮影) を参照。

画像撮影後の処理を ImagePicker のときと同じく setImage で行えば良い。

カメラを使うか、フォトライブラリから選択するかを action で選択させるようにしている。

補足: ファイルアップロードがなければ axios 自体は利用可能

axios でファイルアップロードする場合に必要な form-data が使えないというだけなので、axios 自体は問題なく利用可能。

API の検証には JSONPlaceholder - Fake online REST API for developers を使った。

1
2
3
4
5
6
7
8
9
10
11
12
13
14
15
16
17
18
19
20
21
22
23
24
25
26
27
28
29
30
31
32
33
34
35
36
37
38
39
40
41
42
43
44
45
46
47
48
49
50
51
52
53
54
55
56
<template>
<Page>
<ActionBar title="Post data"/>
<StackLayout>
<Label class="label" text="Post data"/>
</StackLayout>
</Page>
</template>

<script >
import axios from 'axios';

export default {
data() {
return {
apiBase: 'https://jsonplaceholder.typicode.com/posts',
}
},
async created() {
await this.axiosGet();
await this.axiosPost();
await this.axiosPut();
},
methods: {
async axiosGet() {
console.log('=== GET example ===');
const url = `${this.apiBase}`;
const res = await axios.get(url);
console.log({res});
},
async axiosPost() {
console.log('=== POST example ===');
const url = `${this.apiBase}`;
const data = {
title: 'my title',
body: 'my body',
userId: 1,
}
const res = await axios.post(url, data);
console.log({res});
},
async axiosPut() {
console.log('=== PUT example ===');
const url = `${this.apiBase}/1`;
const data = {
id: 1,
title: 'new title',
body: 'new body',
userId: 1,
}
const res = await axios.put(url, data);
console.log({res});
},
},
}
</script>

まとめ

  • axios + form-data でのアップロードは不可
    • ファイルアップロード無しの単純な API Request なら axios でも可能
  • nativescript-background-http でアップロード
  • iOS で フォトライブラリやカメラを使う場合、一度アプリ内にファイルを保存する必要がある

その他・メモ

2020/05/01 追記

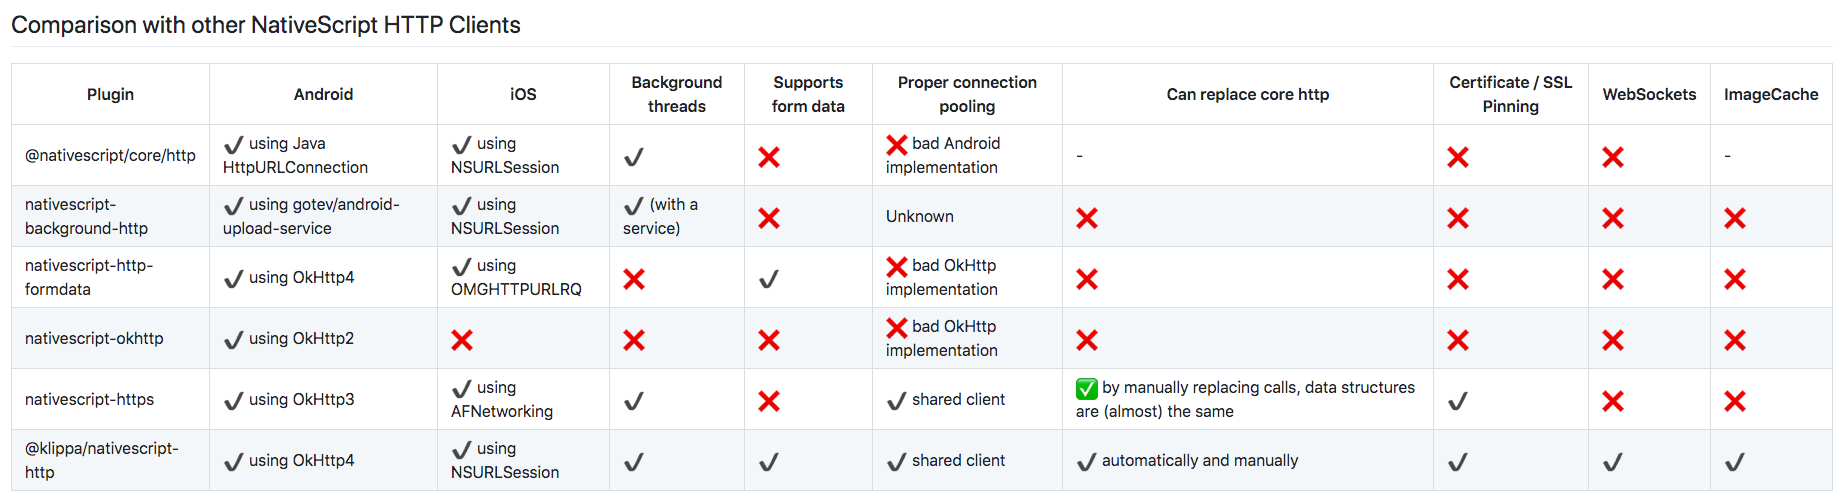
今からなら klippa-app/nativescript-http を試してみるのもありそう。

参考文献

関連記事

この記事が参考になった方
ここここからチャージや購入してくれると嬉しいです(ブログ主へのプレゼントではなく、ご自身へのチャージ)
欲しいもの / Wish list