はじめに

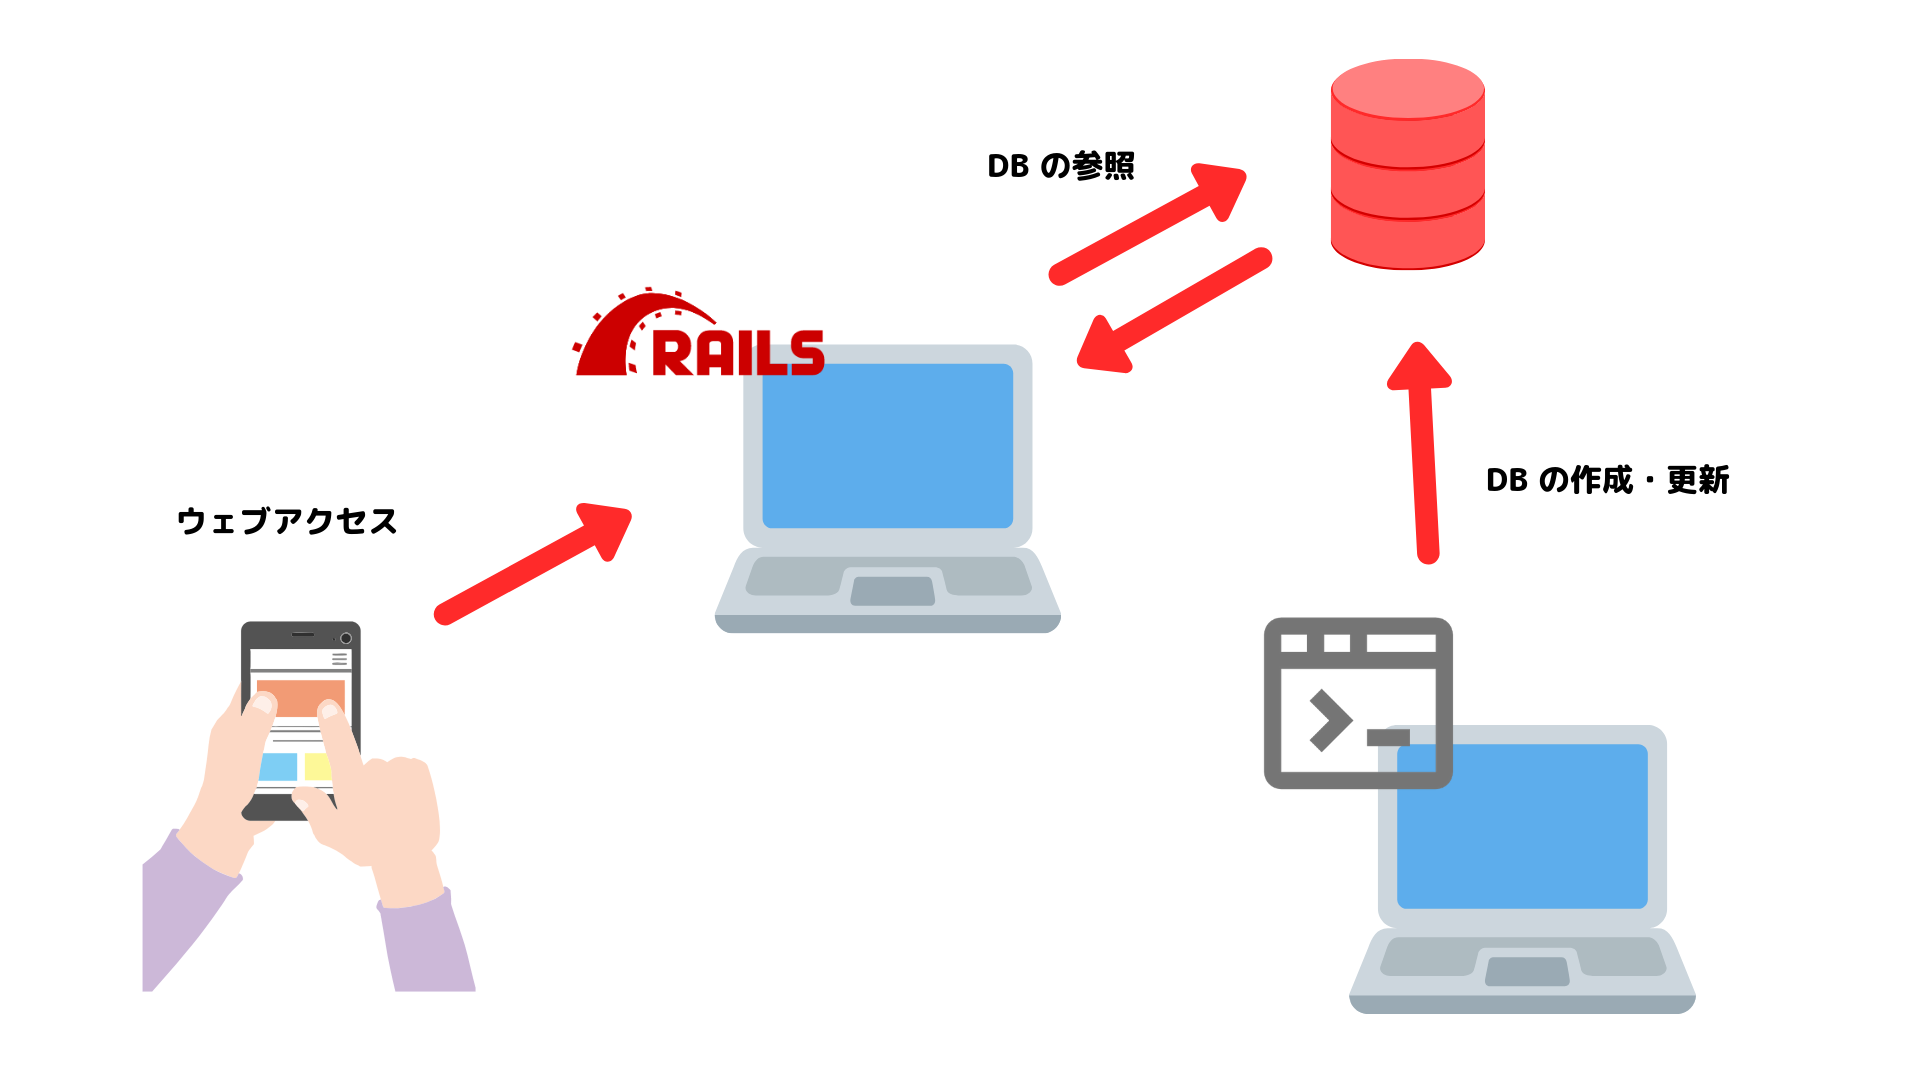
NativeScript(NativeScript-Vue) で QRコードの読取りを行う方法。

TL;DR

この記事が参考になった方
ここここからチャージや購入してくれると嬉しいです(ブログ主へのプレゼントではなく、ご自身へのチャージ)
欲しいもの / Wish list

目次

  1. はじめに
  2. TL;DR
  3. 環境・条件
  4. 詳細
    1. 前置き
      1. 読取り可能なコード
    2. セットアップ
      1. インストール
      2. カメラ利用時の許可文を設定
    3. 実装
      1. ポイント
    4. その他・Tips
      1. 連続読取り
      2. カメラ利用権限の確認
  5. まとめ
  6. 参考文献

環境・条件

1
2
3
4
5
6
7
8
9
10
11
12
13
14
15
16
17
18
19
20
21
22
23
24
25
26
27
28
29
30
31
32
33
34
35
36
37
38
39
40
41
42
43
44
45
46
47
48
49
$ sw_vers
ProductName: Mac OS X
ProductVersion: 10.15.3
BuildVersion: 19D76

$ node -v
v12.7.0

$ npm -v
6.10.3

$ tns --version
6.4.0

$ grep -C1 version package.json
"tns-ios": {
"version": "6.4.1"
},
"tns-android": {
"version": "6.4.1"
}

$ tns plugin
Dependencies:
┌──────────────────────────────┬─────────┐
│ Plugin │ Version │
│ @nativescript/theme │ ^2.2.1 │
│ @vue/devtools │ ^5.0.6 │
│ nativescript-barcodescanner │ ^3.4.1 │
│ nativescript-plugin-firebase │ ^10.4.0 │
│ nativescript-socketio │ ^3.2.1 │
│ nativescript-toasty │ ^1.3.0 │
│ nativescript-vue │ ^2.4.0 │
│ nativescript-vue-devtools │ ^1.2.0 │
│ tns-core-modules │ ^6.0.0 │
│ vue-router │ ^3.1.5 │
└──────────────────────────────┴─────────┘
Dev Dependencies:
┌────────────────────────────────────┬─────────┐
│ Plugin │ Version │
│ @babel/core │ ^7.0.0 │
│ @babel/preset-env │ ^7.0.0 │
│ babel-loader │ ^8.0.2 │
│ nativescript-dev-webpack │ ^1.0.0 │
│ nativescript-vue-template-compiler │ ^2.0.0 │
│ nativescript-worker-loader │ ~0.9.0 │
│ node-sass │ ^4.9.2 │
│ vue-loader │ ^15.4.0 │
└────────────────────────────────────┴─────────┘
  • iPhone 11 Pro: iOS 13.3
  • Android HUAWEI nova lite 2: Android 9 (ビルド 9.1.0.160)

詳細

リポジトリ: 17number/nativescript-vue-tutorial

参考コミット:

前置き

読み飛ばしても OK

読取り可能なコード

Supported barcode types にまとまっている。

バーコードの種類に関しては以下サイトを参照

iOS/Android 共通

共通で使えるものだけ引用

  • CODE_39
  • CODE_93
  • CODE_128
  • DATA_MATRIX
  • EAN_8
  • EAN_13
  • ITF (also known as ITF14)
  • PDF_417 (on Android only when passed in explicity via formats)
  • QR_CODE
  • UPC_A
  • UPC_E

セットアップ

インストール

tns plugin add nativescript-barcodescanner でインストール

1
$ tns plugin add nativescript-barcodescanner

カメラ利用時の許可文を設定

画像の赤枠部分

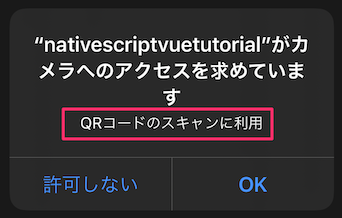
app/App_Resources/iOS/Info.plist を編集。
参考: iOS runtime permission reason

1
2
3
4
5
6
7
8
 ...
<plist version="1.0">
<dict>
...
+ <key>NSCameraUsageDescription</key>
+ <string>QRコードのスキャンに利用</string>
</dict>
</plist>

実装

今回は NativeScript-Vue を使っているので、以下を参考に実装

app/main.js を編集。

1
2
3
4
5
+// QR Scan
+Vue.registerElement(
+ 'BarcodeScanner',
+ () => require('nativescript-barcodescanner').BarcodeScannerView
+);

QR コードのスキャン部は、app/pages/ScanQR.vue に切り出した。

1
2
3
4
5
6
7
8
9
10
11
12
13
14
15
16
17
18
19
20
21
22
23
24
25
26
27
28
29
30
31
32
33
34
35
36
37
38
39
40
41
42
43
44
45
46
47
48
49
50
51
52
53
54
55
56
57
58
59
60
61
62
63
64
65
66
67
68
69
70
71
72
73
74
75
76
77
78
79
80
81
82
83
84
85
86
87
88
89
90
91
92
93
94
<template>
<Page>
<ActionBar title="Scan QR"/>
<GridLayout columns="*" rows="auto, auto, auto, auto">
<Label row="0" class="message" text="Check the console log for scanned barcodes" textWrap="true"></Label>
<Label row="1" class="message" :text="`Scan result: ${text} (format: ${format})`" textWrap="true"></Label>
<Button row="2" class="btn btn-primary btn-rounded-sm" text="back camera, with flip" @tap="doScanWithBackCamera"></Button>
<Button row="3" class="btn btn-primary btn-rounded-sm" text="front camera, no flip" @tap="doScanWithFrontCamera"></Button>
<BarcodeScanner
row="4"
height="300"
formats="QR_CODE"
beepOnScan="true"
reportDuplicates="true"
preferFrontCamera="false"
@scanResult="onScanResult"
v-if="isIOS"
/>
</GridLayout>
</Page>
</template>

<script >
import {isIOS} from "tns-core-modules/platform";
import {BarcodeScanner} from "nativescript-barcodescanner";

export default {
name: 'ScanQR',
data() {
return {
isIOS,
text: '',
format: '',
};
},
methods: {
goToHome() {
console.log('tapped button "go to home"');
this.$navigateTo(home, {
transitionAndroid: { name: 'slide' },
});
},
onScanResult(e) {
this.text = e.text;
this.format = e.format;
},
doScanWithBackCamera() {
this.scan(false);
},
doScanWithFrontCamera() {
this.scan(true);
},
scan(front) {
new BarcodeScanner().scan({
cancelLabel: "EXIT. Also, try the volume buttons!", // iOS only, default 'Close'
cancelLabelBackgroundColor: "#333333", // iOS only, default '#000000' (black)
message: "Use the volume buttons for extra light", // Android only, default is 'Place a barcode inside the viewfinder rectangle to scan it.'
preferFrontCamera: front, // Android only, default false
showFlipCameraButton: true, // default false
showTorchButton: true, // iOS only, default false
torchOn: false, // launch with the flashlight on (default false)
resultDisplayDuration: 500, // Android only, default 1500 (ms), set to 0 to disable echoing the scanned text
beepOnScan: true, // Play or Suppress beep on scan (default true)
openSettingsIfPermissionWasPreviouslyDenied: true, // On iOS you can send the user to the settings app if access was previously denied
closeCallback: () => {
console.log("Scanner closed @ " + new Date().getTime());
}
}).then(
function (result) {
console.log({result});
this.text = result.text;
this.format = result.format;
}.bind(this),
function (errorMessage) {
console.log("No scan. " + errorMessage);
}
);
},
},
}
</script>

<style scoped>
ActionBar {
background-color: #53ba82;
color: #ffffff;
}
.message {
vertical-align: center;
text-align: center;
font-size: 20;
color: #53ba82;
}
</style>

ポイント

  • Embedding the scanner (iOS)(iOS) とあるように、スキャン機能のページ内埋め込みは iOS のみ対応
    • onScanResult で読取り結果を受け取れる
    • Android で使用するとアプリがクラッシュするので注意
  • タップでカメラを起動(カメラ画面に遷移)して読取りは、iOS/Android 共通で利用可能

その他・Tips

詳細な使い方は Usage を参照

連続読取り

function: scan (bulk / continuous mode)

カメラ利用権限の確認

function: hasCameraPermission / requestCameraPermission

プロダクトで利用する場合、権限の確認やリクエスト、「拒否」が選択された(されていた)場合のダイアログ表示(「設定」アプリから許可してね的な内容)が必要と思われる。

まとめ

参考文献

関連記事

この記事が参考になった方
ここここからチャージや購入してくれると嬉しいです(ブログ主へのプレゼントではなく、ご自身へのチャージ)
欲しいもの / Wish list