NativeScript + Firebase でプッシュ通知
はじめに
NativeScript + Firebase でプッシュ通知を行う方法。
TL;DR
- プラグイン: EddyVerbruggen/nativescript-plugin-firebase
- 設定手順: Enabling Firebase Cloud Messaging (FCM)
- Android のビルドで 64K 問題が発生する場合は
multiDexEnabled trueを追加
目次
環境・条件
1 | $ sw_vers |
- iPhone 11 Pro: iOS 13.3
- Android HUAWEI nova lite 2: Android 9 (ビルド 9.1.0.160)
詳細
リポジトリ: 17number/nativescript-vue-tutorial
参考コミット(時系列順):
セットアップ
Firebase プロジェクトの作成など
参考: 条件は多少異なるが Vue + Cordova + Firebase でプッシュ通知 に手順をまとめている。
Identifier/Profile 作成(iOS 事前準備)
Identifier/Profile を作成して、キーチェーンへの登録などを実施する
iOS: Identifier/Profile 作成 を参照
Firebase プロジェクト作成、アプリ追加
プロジェクト作成とアプリ追加を行う
Firebase の設定 を参照
GoogleService-Info.plist(iOS), google-services.json(Android) をダウンロードできれば OK
ダウンロードしたファイルは app/App_Resources/iOS/, app/App_Resources/Android/ に配置。
※該当ディレクトリが無い場合は、プラットフォームを追加するなり、アプリを実行するなりすれば作成されると思われる。
1 | # cp なり mv なりドラッグアンドドロップで配置 |
APNs 証明書の登録(iOS)
.p12 ファイルを作成してアップロードする
APNs 証明書の登録 を参照
プラグインのインストール
tns plugin add nativescript-plugin-firebase を実行。色々と聞かれるので Firebase Cloud Messaging, In-App Messaging を有効化。
※各環境に合わせて適宜設定。
1 | $ tns plugin add nativescript-plugin-firebase |
共通設定
package.json 変更
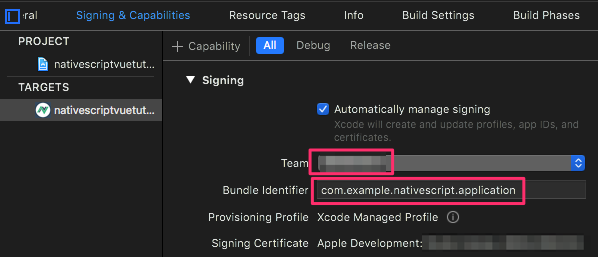
アプリ作成時に Identifier を指定していない場合、com.example.nativescript.application になっていると思うので、前の手順で作成した Identifier に変更しておく。
package.json
1 | { |
Token の受信処理 追加
app/main.js を編集し、token, message 関連の処理を追加。
※ひとまず token や message をログ出力するだけにしているが、実際には適切な処理が必要。
1 | ... |
iOS
iOS - Enabling Firebase Cloud Messaging (FCM)
pod repo update
pod repo update を実行
参考: iOS (Cocoapods)
1 | $ pod repo update |
Xcode の設定変更
1 | $ open platforms/ios/<YourApp>.xcworkspace |
※.xcworkspace が無い場合は、tns run ios --bundle を実行すれば作成されるはず
Team, Bundle Identifier 変更
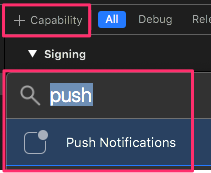
Push 通知有効化
設定ファイルのコピー
Push 通知用の設定ファイルが platforms/ios/<YourApp>/<YourApp>.entitlements or platforms/ios/<YourApp>/Resources/<YourApp>.entitlements に作成されているはずなので、app/App_Resources/iOS/ にコピー。
1 | $ cp platforms/ios/<YourApp>/<YourApp>.entitlements app/App_Resources/iOS/ |
※開発用の場合は <string>development</string>、リリース用は <string>production</string> に設定
バックグラウンド通知の有効化
app/App_Resources/iOS/Info.plist を編集
1 | ... |
動作確認(iOS)
ここまでできたら実機接続して tns run ios --bundle で確認。Firebase などのインストールが実行されるのでしばらく待つ。
1 | $ tns run ios --bundle |
問題なければアプリケーションが起動して「通知許可のダイアログ」が表示される。コンソール上に token が表示されているので値をコピー。
1 | ... |
Firebase コンソール からテストメッセージを送信して、iOS デバイスで受信できれば OK。
参考: プッシュ通知の受信確認
Android
app.gradle 編集
app/App_Resources/Android/app.gradle を編集
Google Play Services Version - EddyVerbruggen/nativescript-plugin-firebase に書かれているように project.ext の設定を追加。
1 | android { |
メソッド数の上限に引っ掛かることがある(引っ掛かった)ので multiDexEnabled true を追加。
参考1: 64K を超えるメソッドを使用するアプリ向けに multidex を有効化する | Android デベロッパー
参考2: java - Android gives error “Cannot fit requested classes in a single dex file” - Stack Overflow
参考3: [Android]Android 64k問題を回避するための設定方法(Cannot fit requested classes in a single dex file / Too many field references) - みんなのプログラミング by Telulu LLC
1 | android { |
ちなみに multiDexEnabled true を追加しないとビルド時に以下のエラーとなり、実行できなかった。
1 | $ tns debug android --bundle |
動作確認(Android)
iOS と同様に実機接続して tns run android --bundle で確認。
1 | $ tns run android --bundle |
問題なければアプリケーションが起動、コンソール上に token が表示されているので値をコピー。
1 | ... |
あとは同じように Firebase コンソール からテストメッセージを送信して、Android デバイスで受信できれば OK。
なお、フォアグラウンドにしていると表示されない(はず)ので、バックグラウンドに切り替えてからメッセージを送った方が良い。
場合によっては通知ポップアップが表示されないかもなので、通知センターを開いておくほうがわかりやすい。(「通知ポップアップが表示されない」の原因までは追っていない)
その他, Tips
常にフォアグラウンドで通知(iOS Only)
firebase.init 時に showNotificationsWhenInForeground: true を設定すると、常にフォアグラウンドで通知される
参考: Always show notifications when the application is in foreground
1 | firebase.init({ |
ドキュメントには明記されていないが、コメント によると showNotificationsWhenInForeground: true は iOS 限定のもののようなので注意。
that’s an iOS-only property according to that documentation.
https://github.com/EddyVerbruggen/nativescript-plugin-firebase/issues/1136#issuecomment-460989406 より
Android で正しくシステム通知を表示させるには、送信メッセージのフォーマットを正しく指定すると良い(らしい)。
参考: https://github.com/EddyVerbruggen/nativescript-plugin-firebase/issues/1136#issuecomment-462447162
たぶん、Cordova で試したときの内容と同じ話。
参考: フォアグラウンドでのプッシュ通知受信
topic 購読/解除
1 | // 購読 |
iOS でインタラクティブ通知
以下画像のようなことも可能
Interactive notifications (iOS only for now)

まとめ
- プラグイン: EddyVerbruggen/nativescript-plugin-firebase
- 設定手順: Enabling Firebase Cloud Messaging (FCM)
- Android のビルドで 64K 問題が発生する場合は
multiDexEnabled trueを追加
参考文献
- nativescript-plugin-firebase - npm
- EddyVerbruggen/nativescript-plugin-firebase: NativeScript plugin for Firebase, the leading realtime JSON app platform
- nativescript-plugin-firebase/MESSAGING.md at master · EddyVerbruggen/nativescript-plugin-firebase
- NativeScriptでPUSH通知を受信する(Firebase編) - Qiita
- NativeScript: Push Notifications with Firebase Cloud Messaging
- 64K を超えるメソッドを使用するアプリ向けに multidex を有効化する | Android デベロッパー
- java - Android gives error “Cannot fit requested classes in a single dex file” - Stack Overflow
- [Android]Android 64k問題を回避するための設定方法(Cannot fit requested classes in a single dex file / Too many field references) - みんなのプログラミング by Telulu LLC
関連記事
- NativeScript-Vue でネイテイブアプリの開発(チュートリアル + α)
- NativeScript, JsBarcode でバーコードを 生成/描画
- NativeScript でデバイスの輝度(明るさ)を制御する
- NativeScript-Vue で QRコードの読取り
- NativeScript で入力範囲外タップでキーボードを非表示にする
- NativeScript-Vue で次入力欄にフォーカスする方法
- JavaScript で URL のクエリパラメータを操作する方法
- jQuery Select2 で、初期値の設定と選択状態のクリア