はじめに
NativeScript で カメラを使って写真を撮影する方法。
TL;DR
目次
- はじめに
- TL;DR
- 環境・条件
- 詳細
- セットアップ
- インストール
- カメラ/フォトライブラリ 利用時の許可文を設定(iOS)
- 実装
- カメラ/フォトライブラリ 権限要求
- 撮影
- サンプル実装
- まとめ
- その他・メモ
- 参考文献
環境・条件
1
2
3
4
5
6
7
8
9
10
11
12
13
14
15
16
17
18
19
20
21
22
23
24
25
26
27
28
29
30
31
32
33
34
35
36
37
38
39
40
41
42
43
44
45
46
47
48
49
50
| $ sw_vers
ProductName: Mac OS X
ProductVersion: 10.15.3
BuildVersion: 19D76
$ node -v
v12.7.0
$ npm -v
6.10.3
$ tns --version
6.4.0
$ grep -C1 version package.json
"tns-ios": {
"version": "6.4.1"
},
"tns-android": {
"version": "6.4.1"
}
$ tns plugin
Dependencies:
┌───────────────────────────────┬─────────┐
│ Plugin │ Version │
│ @nativescript/theme │ ^2.2.1 │
│ @vue/devtools │ ^5.0.6 │
│ nativescript-barcodescanner │ ^3.4.1 │
│ nativescript-camera │ ^4.5.0 │
│ nativescript-fingerprint-auth │ ^7.0.2 │
│ nativescript-plugin-firebase │ ^10.4.0 │
│ nativescript-socketio │ ^3.2.1 │
│ nativescript-toasty │ ^1.3.0 │
│ nativescript-vue │ ^2.4.0 │
│ nativescript-vue-devtools │ ^1.2.0 │
│ tns-core-modules │ ^6.0.0 │
└───────────────────────────────┴─────────┘
Dev Dependencies:
┌────────────────────────────────────┬─────────┐
│ Plugin │ Version │
│ @babel/core │ ^7.0.0 │
│ @babel/preset-env │ ^7.0.0 │
│ babel-loader │ ^8.0.2 │
│ nativescript-dev-webpack │ ^1.0.0 │
│ nativescript-vue-template-compiler │ ^2.0.0 │
│ nativescript-worker-loader │ ~0.9.0 │
│ node-sass │ ^4.9.2 │
│ vue-loader │ ^15.4.0 │
└────────────────────────────────────┴─────────┘
|
- iPhone 11 Pro: iOS 13.3
- Android HUAWEI nova lite 2: Android 9 (ビルド 9.1.0.160)
詳細
リポジトリ: 17number/nativescript-vue-tutorial
参考コミット:
セットアップ
インストール
1
| $ tns plugin add nativescript-camera
|
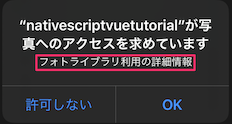
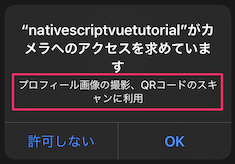
カメラ/フォトライブラリ 利用時の許可文を設定(iOS)
app/App_Resources/iOS/Info.plist を編集
参考: Requesting permissions
1
2
3
4
5
6
7
8
9
10
| ...
<plist version="1.0">
<dict>
...
+ <key>NSCameraUsageDescription</key>
+ <string>プロフィール画像の撮影、QRコードのスキャンに利用</string>
+ <key>NSPhotoLibraryUsageDescription</key>
+ <string>フォトライブラリ利用の詳細情報</string>
</dict>
</plist>
|
実装
カメラ/フォトライブラリ 権限要求
requestPermissions() で カメラ/フォトライブラリ の利用権限を要求。
許可された場合にのみ「カメラ起動」などを行う。
1
2
3
4
5
6
7
8
9
10
11
12
| camera.requestPermissions().then(
() => {
console.log('Permitted');
},
() => {
console.log('Denied');
},
);
|
撮影
takePicture() で カメラ起動〜撮影。
imageAsset に画像データが入っている。
1
2
3
| camera.takePicture()
.then(imageAsset => console.log({imageAsset}))
.catch(err => console.error({err}));
|
オプション指定 も可能。
1
2
3
4
5
6
7
8
| camera.takePicture({
width: 100,
height: 200,
keepAspectRatio: true,
saveToGallery: false,
allowsEditing: true,
cameraFacing: 'front',
}).then().catch();
|
サンプル実装
NativeScript-Vue を使った例
1
2
3
4
5
6
7
8
9
10
11
12
13
14
15
16
17
18
19
20
21
22
23
24
25
26
27
28
29
30
31
32
33
34
35
36
37
38
39
40
41
42
43
44
45
46
47
48
49
50
| <template>
<Page @swipe="onSwipe">
<ActionBar title="Home"/>
<StackLayout>
<Button text="Take a photo" @tap="takePhoto" />
<Image :src="image" v-if="image" />
</StackLayout>
</Page>
</template>
<script >
import * as camera from 'nativescript-camera';
export default {
name: 'home',
data() {
return {
image: null,
};
},
methods: {
takePhoto() {
camera.requestPermissions().then(
() => {
console.log('Permitted');
camera.takePicture({
keepAspectRatio: true,
saveToGallery: false,
allowsEditing: true,
cameraFacing: 'rear',
}).then(imageAsset => {
console.log({imageAsset});
this.image = imageAsset;
})
.catch(err => console.error({err}));
},
() => {
console.log('Denied');
alert({
title: 'カメラ利用',
message: 'カメラを利用するには「設定」→「プライバシー」から「写真」と「カメラ」の利用を許可してください',
okButtonText: 'OK',
})
},
);
},
},
}
</script>
|
まとめ
その他・メモ
nstudio/nativescript-camera-plus というプラグインもある。
参考文献
関連記事