Chrome 拡張機能でリクエストヘッダをカスタマイズする方法
はじめに
Chrome 拡張機能で外部サイトへの HTTP リクエスト時に Request Headers をカスタマイズする方法について整理した。
User Agent を変更したり、Cookie を付与したり、色々とできるようになる。
TL;DR
chrome.webRequest.onBeforeSendHeadersを使う- 一部の内容はイベントハンドラ内で参照できないし、設定しても保証されない
- User Agent を変更したり、Cookie を付与したりできる
目次
環境・条件
Google Chrome バージョン: 78.0.3904.108(Official Build) (64 ビット)
詳細
リポジトリ: 17number/chrome-extension-custom-req-header-sample
Chrome 拡張機能のライフサイクル
前置き、読み飛ばしても OK。
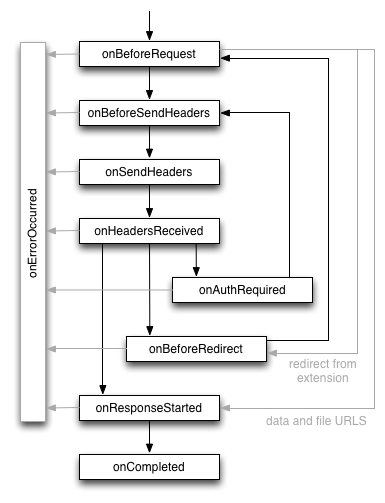
onBeforeSendHeaders (optionally synchronous)
Fires when a request is about to occur and the initial headers have been prepared.
The event is intended to allow extensions to add, modify, and delete request headers (*).
The onBeforeSendHeaders event is passed to all subscribers, so different subscribers may attempt to modify the request; see the Implementation details section for how this is handled.
This event can be used to cancel the request.
以下は Google 翻訳。
- リクエストが発生し、初期ヘッダーが準備されたときに発生します。
- このイベントは、拡張機能がリクエストヘッダー(*)を追加、変更、削除できるようにすることを目的としています。
onBeforeSendHeadersイベントはすべてのサブスクライバーに渡されるため、異なるサブスクライバーが要求を変更しようとする場合があります。 この処理方法については、実装の詳細セクションをご覧ください。- このイベントを使用して、リクエストをキャンセルできます。
要約すると下記。
- リクエストヘッダーをいじったり、リクエスト自体をキャンセルできるよ
- 他の拡張機能にも影響あるから、気をつけてな(のはず)
注釈に書いてあるが、以下の内容に関してはイベントフック時には提供されない(らしい)。変更しても適用されない(かもしれない)。
AuthorizationCache-ControlConnectionContent-LengthHostIf-Modified-SinceIf-None-MatchIf-RangePartial-DataPragmaProxy-AuthorizationProxy-ConnectionTransfer-Encoding
公式の実装例: Implementation details
実装方法
リクエストヘッダに独自要素を追加して https://www.google.co.jp にアクセス(GET)するだけの拡張機能を作る。
manifest.json
ポイントは "permissions" に "webRequestBlocking" を指定していること。
単に外部サイトにアクセスするだけなら "webRequest" で良いが、onBeforeSendHeaders を使うには "webRequestBlocking" も指定する(っぽい)。
1 | { |
※$.ajax を使うので、事前に Download jQuery | jQuery で jQuery を落としておく。
background.js
メインの部分。
1 | ; |
イベントハンドラの引数 details.requestHeaders でリクエストヘッダが取得できる、中身は name, value を持つオブジェクトの配列。
1 | [ |
なので、同じ構造でデータを追加したり、
1 | headers.push({ name: 'hoge', value: 'fuga' }); |
名前が一致するものを探して値を書き換えたりできる。
1 | headers.forEach(header => { |
最終的に requestHeaders をキーとしたオブジェクトを return することで、変更後のリクエストヘッダが使用される。
1 | return { requestHeaders: headers }; |
以下は Developer tools のキャプチャ。

まとめ
chrome.webRequest.onBeforeSendHeadersを使う- 一部の内容はイベントハンドラ内で参照できないし、設定しても保証されない
- User Agent を変更したり、Cookie を付与したりできる
参考文献
- chrome.webRequest - Google Chrome
- XMLHttpRequest で User-Agent を誤魔化す方法 - ひでたそ覚書帳
- Chrome拡張でのユーザーエージェント書き換え実装 - Qiita
- javascript - Associate a custom user agent to a specific Google Chrome page/tab - Stack Overflow
- javascript - Set user agent for HTTP request in Chrome extension - Stack Overflow
関連記事
- Chrome 拡張機能で background scripts から content scripts にメッセージを送信する
- Chrome 拡張機能で CSV ファイルを生成してダウンロードする方法
- Chrome 拡張機能で同梱されたファイルにアクセス(画像を表示する例)
- Vue.js を使ってメインページ側で動作する Chrome 拡張機能を開発する方法
- vue-web-extension を使って Chrome 拡張機能を開発する方法
- Chrome 拡張機能の開発中にホットリロード(自動読み込み)する方法
- JavaScript で URL のクエリパラメータを操作する方法
- jQuery Select2 で、初期値の設定と選択状態のクリア